
Add a New Partner
Information about donors and other individuals who support your mission is stored in partner records (also known as donor and constituent records). You can add individual partner records to Aegis CRM or add multiple records using Rapid Entry.
Note:It is a best practice to search Aegis CRM for current records before adding a new record to the database.
To add a new partner record in Aegis CRM, click Partners on the Navigation menu, select New Partner and then follow these steps:
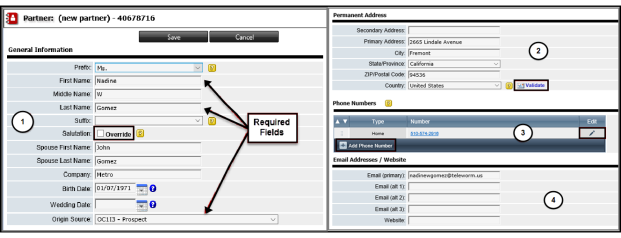
- Enter the First Name and Last Name of the partner and then select the Origin Source for the information you have about the partner. Enter additional information about the partner and the more details you enter, the better results you receive when you create queries and generate reports.
- Mark the Override checkbox and then enter a salutation for communications sent to the partner.
- Enter address information for the partner in the Primary Address, City, State/Province, ZIP/Postal Code, and Country fields. Enter any care of or attention details in the Secondary Address field.
- Click Validate to ensure proper delivery and populate the Geographic / Postal / Demographic details for the primary address.
- Click Add Phone Number, select the Type, and then enter the number including area code. Click the check mark to add the number.
- To modify an added phone number, click the Edit icon.
- Enter a primary email address and any alternate addresses. If the partner has a website, enter the URL address in the Website field.
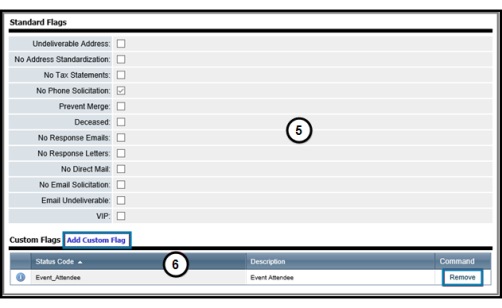
- Mark the checkboxes in the Standard Flags section to help segment records by specific criteria.
EXAMPLE: Mark the No Phone Solicitation checkbox to include this partner in a query created to identify partner records who do not want to be contacted by phone.
- Mark the Undeliverable Address checkbox if the mailing address on file has been returned as undeliverable.
- Mark the No Address Standardization checkbox if you do not want the entered address to be standardized. Address standardization is the process of making an address uniform. This includes fully spelling out words or using the US Postal Service's standard abbreviations.
- Mark the No Tax Statements checkbox if the partner requests that he or she not be sent tax statements.
- Mark the No Phone Solicitation checkbox if the partner requests that he or she should not be contacted via telephone.
- Mark the Prevent Merge checkbox if there is a reason why this partner's record should not be merged with another record having the same name and contact information.
- Mark the Deceased checkbox if notification is received that this partner is deceased.
- Mark the No Response Emails checkbox if the partner requests that he or she does not want to receive response emails.
- Mark the No Response Letters checkbox if the partner does not want to receive response letters.
- Mark the No Direct Mail checkbox if the partner does not want to receive direct mail.
- Mark the No Email Solicitation checkbox if the partner does not want to receive solicitations via email.
- Mark the Email Undeliverable checkbox if the email sent to this partner with the provided email address could not be delivered.
- Mark the VIP checkbox if this partner is a VIP partner.
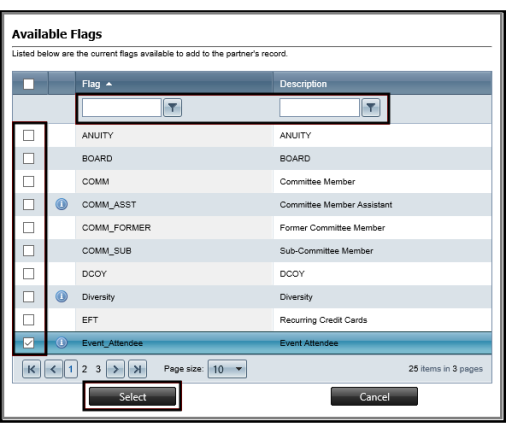
- Click Add Custom Flag to select the flags to add to the partner record.
- Enter criteria in the Flag and Description fields to filter the list of available flags that display on the page.
- Mark the checkboxes for the custom flags to add to the partner record and then click Select.
- Mark the Undeliverable Address checkbox if the mailing address on file has been returned as undeliverable.
- Mark the No Address Standardization checkbox if you do not want the entered address to be standardized for some reason. Address standardization is the process of making an address uniform. This includes fully spelling out words or using the US Postal Service's standard abbreviations.
- Mark the No Tax Statements checkbox if the partner requests that he or she not be sent tax statements.
- Mark the No Phone Solicitation checkbox if the partner requests that he or she should not be contacted via telephone.
- Mark the Prevent Merge checkbox if there is a reason why this partner's record should not be merged with another record having the same name and contact information.
- Mark the Deceased checkbox if notification is received that this partner is deceased.
- Mark the No Response Emails checkbox if the partner requests that he or she does not want to receive response emails.
- Mark the No Response Letters checkbox if the partner requests that he or she does not want to receive response letters.
- Mark the No Direct Mail checkbox if the partner does not want to receive direct mail.
- Mark the No Email Solicitation checkbox if the partner has indicated that he or she does not want to receive solicitations via email.
- Mark the Email Undeliverable checkbox if the email sent to this partner with the provided email address could not be delivered.
- Mark the VIP checkbox if this partner is a VIP partner.
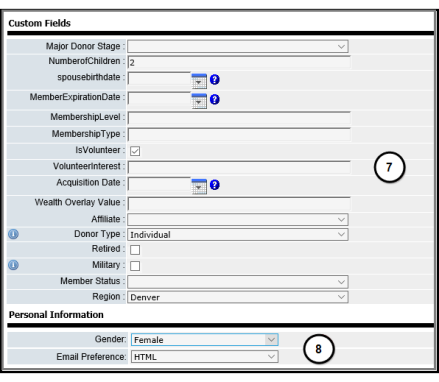
- Enter details or mark checkboxes to add custom fields to the partner record.
- Select the Gender of the partner and the Email Preference (HTML or TEXT) for the format for receiving emails from your organization.
NOTE: The fields that display are specific to your organization and may be different than the options shown in the above graphic.

- The Geographic / Postal / Demographic information based on the validated primary address details you entered display in this section. Any changes to the primary address must be validated to update this information.
- Click Browse to search for an image and then click Upload to add the image to the partner record.
- Click Save.
|
Copyright ©2017 Aegis Premier Solutions |